Why You’ll Love This Apple Pie Ice Cream Recipe
Have you ever craved the comforting flavors of apple pie but wanted a rejuvenating twist? That’s exactly why I fell in love with this apple pie ice cream recipe.
It combines the warm, spiced essence of traditional apple pie with the cool, creamy delight of ice cream. Each bite offers a perfect balance of sweetness and crunch, thanks to the caramelized apples and crushed oatmeal cookies.
Plus, it’s a fantastic way to impress friends and family at gatherings. You’ll savor every spoonful, making it a dessert that’s not just rejuvenating but also nostalgic.
Trust me, you won’t regret trying it!
Ingredients of Apple Pie Ice Cream
Making Apple Pie Ice Cream is a delightful adventure in the kitchen. You’ll be gathering some delicious ingredients that come together to create a dessert that feels like a warm hug on a chilly day.
Imagine the aroma of caramelized apples wafting through your home, blending with the sweet scent of cinnamon. How can you resist? Let’s plunge into the ingredients you’ll need to whip up this mouthwatering treat.
Ingredients for Apple Pie Ice Cream:
- 8 oatmeal cookies, crushed
- 2 tablespoons melted butter, divided
- 2 large apples, peeled, cored, and sliced
- 3 tablespoons white sugar
- 1 teaspoon ground cinnamon
- 3 cups whipping cream
- 1 1/2 cups half-and-half
- 1 cup white sugar
- 3 eggs, beaten
- 1 teaspoon vanilla extract
- 2 teaspoons ground cinnamon
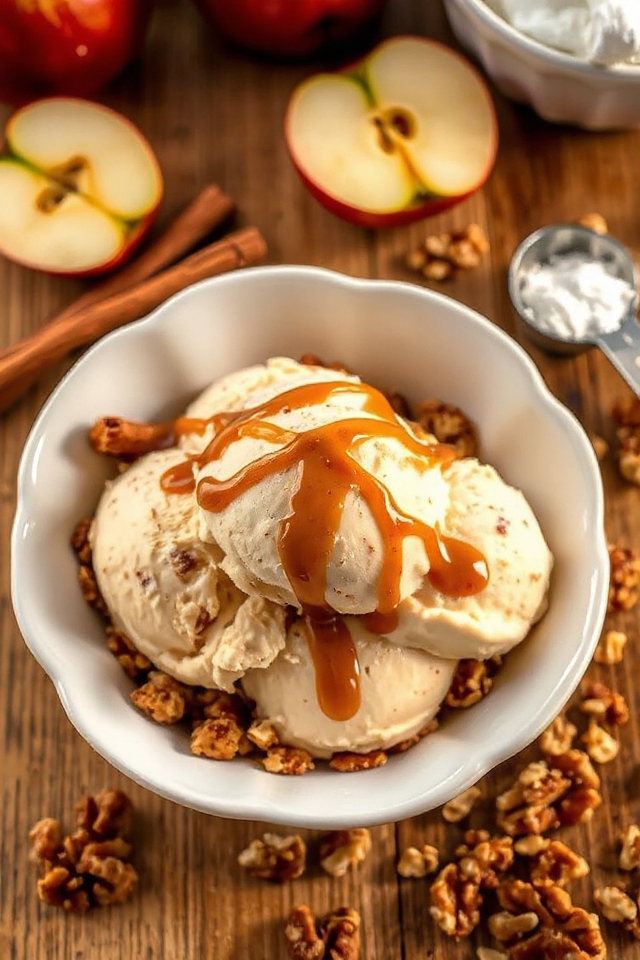
- 1/4 cup chopped toasted walnuts
- 1/4 cup dulce de leche or caramel ice cream topping
When you gather these ingredients, think about the quality you want to use. Fresh apples can elevate the flavor of your ice cream, so try to pick some that are firm and crisp, like Granny Smith or Honeycrisp.
The oatmeal cookies? They’re not just a crunchy base; they add a wholesome sweetness that complements the apples perfectly. And don’t skimp on the walnuts if you like a bit of crunch; they add a lovely texture and flavor contrast.
Finally, the dulce de leche is a game changer. It adds that extra layer of sweetness that can make your ice cream truly irresistible.
How to Make Apple Pie Ice Cream

Making Apple Pie Ice Cream isn’t just a recipe; it’s an experience that fills your kitchen with warmth and sweet aromas. To start, you’ll want to preheat your oven to 375 degrees F (that’s 190 degrees C for our metric friends).
Grab those 8 oatmeal cookies and crush them into fine crumbs. It’s a bit of a workout, but hey, you can burn off some of those ice cream calories before you even start! Mix the crushed cookies with 1 tablespoon of melted butter, then press this mixture onto a baking sheet.
Pop it in the oven for about 5 minutes until it’s just set, then take it out and let it cool. Once it’s cool, crumble it again. You want those little bits to be the perfect crunch for your ice cream.
Next, let’s talk apples. You’ll need 2 large apples for this part. Peel, core, and slice them up – try not to munch on too many before they hit the skillet.
Melt the remaining tablespoon of butter in a skillet over medium heat, then toss in your apple slices, 3 tablespoons of sugar, and 1 teaspoon of cinnamon. Cook them until they’re lightly browned and caramelized, which should take about 10 minutes.
The smell will be heavenly, and you might find yourself snacking on a slice or two (no judgment here). Once they’re done, set those apples aside to cool completely.
Now, for the ice cream base. In a large bowl, combine 3 cups of whipping cream, 1 1/2 cups of half-and-half, 1 cup of sugar, 3 beaten eggs, 1 teaspoon of vanilla extract, and 2 teaspoons of cinnamon.
Mix it all together until it’s well blended. This is where the magic happens, so don’t rush it. Pour this mixture into your ice cream maker and freeze according to the manufacturer’s instructions.
When it’s all churned up and ready, stir in your crumbled cookie, those delicious caramelized apples, and 1/4 cup of chopped toasted walnuts.
And for the final touch, drizzle in 1/4 cup of dulce de leche or caramel topping, stirring gently to distribute it evenly. Now, can you smell that? It’s the smell of happiness. Get ready to scoop and enjoy your homemade Apple Pie Ice Cream!
Apple Pie Ice Cream Substitutions & Variations
Once you’ve mastered the delightful process of creating Apple Pie Ice Cream, you might want to explore some substitutions and variations to make it your own.
For a lighter option, try swapping out half-and-half for almond milk. If you’re feeling adventurous, add in some diced pears or peaches for a fruity twist.
Instead of walnuts, you can use pecans or even skip the nuts altogether. For a spicier kick, toss in a pinch of nutmeg or ginger.
Finally, consider using a store-bought caramel sauce if you’re short on time—it’s a delicious shortcut that doesn’t compromise flavor!
What to Serve with Apple Pie Ice Cream
Serving Apple Pie Ice Cream can elevate your dessert experience to a whole new level.
I love pairing it with a warm slice of traditional apple pie for that ultimate comfort food combo. Drizzling some caramel sauce on top adds a delightful sweetness. Fresh whipped cream is a must; it lightens up the richness of the ice cream.
You might also consider serving it alongside a strong cup of coffee or spiced chai tea to balance the flavors. For a special touch, a sprinkle of cinnamon or nutmeg on top can make all the difference.
Enjoy experimenting with your favorite pairings!
Additional Tips & Notes
Pairing Apple Pie Ice Cream with complementary flavors enhances your dessert experience, but there are also some handy tips to keep in mind while making it.
For a creamier texture, chill your mixture before churning. If you prefer a stronger apple flavor, add more cinnamon and caramelized apples. Don’t forget to taste as you go! Using fresh, high-quality ingredients really makes a difference.
If you want a crunch, try adding more toasted walnuts. Finally, let the ice cream sit at room temperature for a few minutes before scooping; it’ll be much easier to serve.
Enjoy your delicious creation!