
Why You’ll Love This Mocha Ice Cream Recipe
If you’re a coffee lover like me, you’ll absolutely adore this mocha ice cream recipe. It blends rich dark chocolate and robust coffee flavors, creating a delightful treat that’s perfect for any occasion. The creamy texture melts in your mouth, giving you that satisfying indulgence you crave. Plus, making it at home means you can adjust the sweetness to your liking! I love serving it on a hot day or as a decadent dessert after dinner. Trust me, once you try this recipe, you’ll find it hard to go back to store-bought ice cream. It’s simply irresistible!
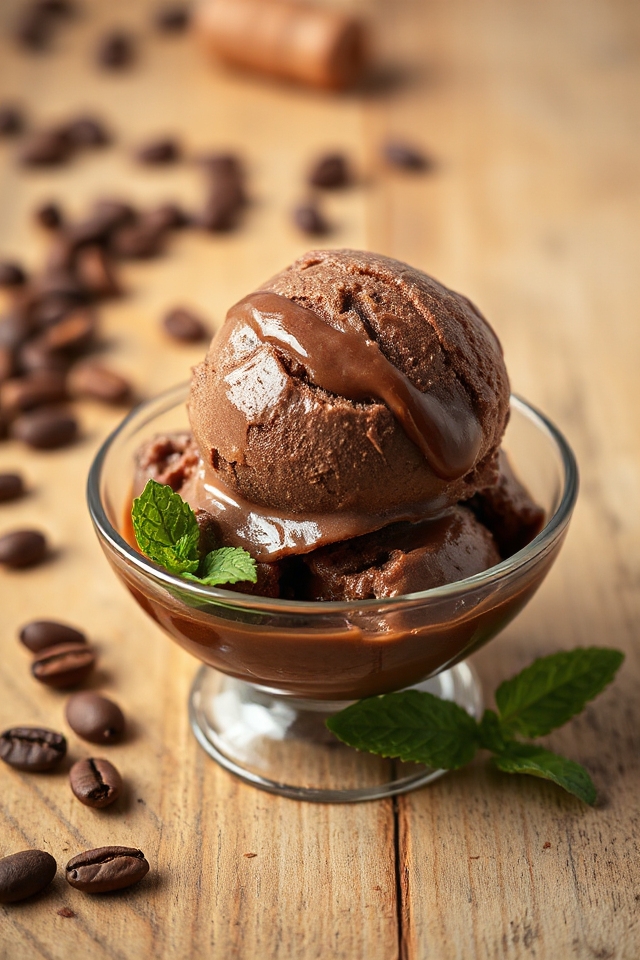
Ingredients of Mocha Ice Cream
Making mocha ice cream at home isn’t just a fun project; it’s a delicious way to combine two of the best flavors: chocolate and coffee. Imagine the rich, creamy texture, the deep, dark chocolate mingling with that bold coffee kick. It’s like a perfect marriage of flavors, and honestly, who wouldn’t want to indulge in that?
You might think it sounds complicated, but I promise, it’s easier than you could ever imagine. So, let’s gather the ingredients and get ready to whip up something truly special.
Here’s what you’ll need to make this delightful mocha ice cream:
- 230 g dark chocolate, coarsely chopped
- 1/4 cup strong brewed coffee
- 2 cups whipping cream
- 1 cup whole milk
- 3/4 cup sugar (divided into 0.5 cup and 0.25 cup)
- 3 tablespoons instant coffee granules
- 4 egg yolks
Now, before you plunge into the kitchen, let’s chat about these ingredients. You might be wondering about the chocolate—dark chocolate is key here because it gives that rich depth of flavor.
If you prefer a sweeter ice cream, you could even use semi-sweet chocolate, but I find that the bittersweet notes of dark chocolate really elevate the overall taste.
And the coffee? Well, the stronger the brew, the better the flavor will be in the final product. I always like to use freshly brewed coffee, but if you’re in a pinch, a good quality instant coffee can work wonders too.
Just remember, this recipe is all about balancing those flavors, so feel free to adjust the sugar if you like it sweeter or the coffee if you want to amp up that caffeine kick. Happy ice cream making!
How to Make Mocha Ice Cream
Making mocha ice cream at home is like inviting a bit of café magic into your kitchen. So, let’s dive right into the steps that will turn those wonderful ingredients into a creamy, dreamy dessert.
First off, grab that 230 g of dark chocolate and pop it into the microwave. Set it to HIGH and heat it for about 1½ minutes, stirring twice along the way. You want that chocolate melted to silky perfection. Once it’s smooth, stir in the 1/4 cup of strong brewed coffee. This is where the magic starts to happen, folks—the combination of chocolate and coffee is simply divine. Set this chocolate-coffee mixture aside for now; we’ll come back to it shortly.
Next, let’s give some attention to the egg yolks. In a bowl, beat together 4 egg yolks and ¼ cup of sugar at high speed with an electric mixer. You want this to become thick and pale—it should look almost like a sunshine yellow cloud.
Now, in a heavy saucepan, bring 2 cups of whipping cream, 1 cup of whole milk, the remaining ½ cup of sugar, and 3 tablespoons of instant coffee granules to a boil over medium-high heat. Stir it gently to make sure everything dissolves nicely. Once it’s bubbling away, reduce the speed of your mixer to low and gradually pour this hot cream mixture into your egg yolk mixture. It’s important to pour slowly to avoid scrambling those yolks.
After everything is combined, return the mixture to the saucepan and cook it over medium heat, stirring constantly for about 6 to 8 minutes. You’re looking for a consistency that thickens enough to coat the back of a wooden spoon.
Now comes the fun part. Remove the saucepan from the heat and stir in that fabulous chocolate-coffee mixture we set aside earlier. It’s like the moment when the final puzzle piece clicks into place.
Cover this mixture and let it chill in the fridge for about 2 hours. Once it’s nice and cool, pour it into your ice cream machine and churn according to the manufacturer’s instructions, which usually takes around 15 to 30 minutes.
When it’s all frozen and creamy, transfer it to a plastic container and pop it in the freezer for at least an hour before serving. And there you have it—your very own homemade mocha ice cream, ready to be scooped and savored. Enjoy every bite, because you totally deserve it!
Mocha Ice Cream Substitutions & Variations
Now that you’ve whipped up a delicious batch of mocha ice cream, let’s explore some fun substitutions and variations to customize your treat.
If you’re looking for a lighter option, swap whole milk for almond or oat milk. For a richer flavor, try adding a splash of vanilla extract or a pinch of cinnamon.
You can also mix in chocolate chips, crushed espresso beans, or even a swirl of caramel for added texture.
If you’re feeling adventurous, incorporate a splash of your favorite liqueur, like Kahlúa or Irish cream, for an adult twist.
The possibilities are endless!
What to Serve with Mocha Ice Cream
What pairs perfectly with the rich, creamy goodness of mocha ice cream? I love serving it alongside a warm slice of chocolate cake; the combination is heavenly.
For a lighter touch, fresh berries, especially raspberries, add a delightful tartness that balances the sweetness. I also enjoy a drizzle of caramel or chocolate sauce for that extra indulgence.
If I’m feeling adventurous, a shot of espresso on the side enhances the coffee flavor beautifully. And let’s not forget crunchy biscotti—perfect for dipping!
These pairings elevate my mocha ice cream experience and make dessert truly memorable.
Additional Tips & Notes
When enjoying mocha ice cream, a few extra tips can enhance your experience even further.
First, I always recommend letting the ice cream sit at room temperature for a few minutes before serving; it makes scooping easier and improves the texture.
If you love a stronger coffee flavor, try adding a bit more instant coffee granules to the mix.
For a fun twist, consider folding in chocolate chips or crushed cookies right before freezing.
Finally, don’t forget to chill your ice cream container before transferring the mixture; it helps maintain the perfect consistency.
Enjoy every creamy bite!