Why You’ll Love This Cherry Chocolate Chip Ice Cream Recipe
When you take a bite of this Cherry Chocolate Chip Ice Cream, you’ll instantly understand why it’s a favorite. The rich, creamy texture perfectly contrasts with the tartness of fresh cherries and the delightful crunch of dark chocolate.
Each spoonful is a harmonious blend of flavors that dances on your palate. I love how it’s invigorating yet indulgent, making it perfect for any occasion.
Plus, it’s incredibly easy to make at home, allowing you to impress friends and family with minimal effort. Trust me, once you try it, you’ll be craving more of this delicious treat all summer long!
Ingredients of Cherry Chocolate Chip Ice Cream
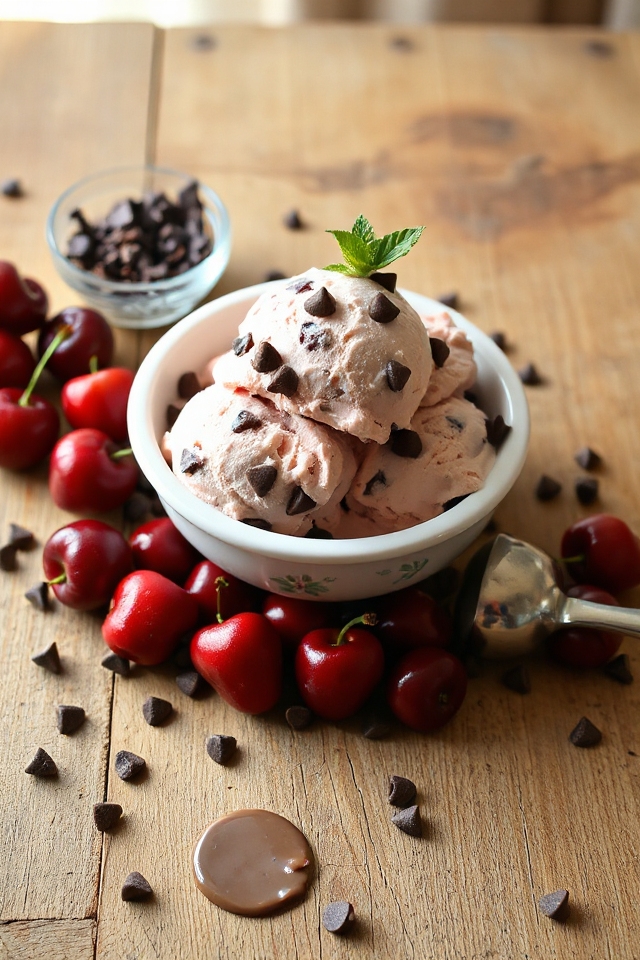
When it comes to making Cherry Chocolate Chip Ice Cream, the right ingredients are key. You want to gather up some fresh cherries, dark chocolate, and a few essential dairy ingredients to create that creamy, dreamy dessert. The blend of tart cherries and rich chocolate is mouthwateringly good, and trust me, you’ll want to have these ingredients on hand for when the craving strikes.
Whether you’re whipping this up for a summer gathering or just treating yourself after a long day, having these elements ready will make the whole process so much easier.
Here’s what you’ll need to gather:
- 3 cups fresh bing cherries (pitted and halved)
- 2 tablespoons kirsch (a cherry brandy)
- 2 tablespoons lemon juice
- 1 1/2 cups sugar (divided)
- 2 1/2 cups heavy cream
- 1 1/2 cups whole milk
- 1 teaspoon vanilla extract
- 1/8 teaspoon cherry extract (optional for extra flavor)
- 2/3 cup dark chocolate (finely chopped or grated)
Now, let’s talk about the cherries. Fresh bing cherries are a must for that sweet-tart flavor, but if you can’t find them, frozen cherries can work in a pinch. Just make sure to thaw and drain them well before using.
As for the kirsch, it adds a lovely depth of flavor, but if you’re looking for a non-alcoholic version, just use an extra splash of cherry juice instead.
And don’t be shy with the chocolate; if you’re a chocoholic like me, feel free to toss in a little more. After all, who can resist that delightful combination?
How to Make Cherry Chocolate Chip Ice Cream

Alright, let’s explore the delicious world of making Cherry Chocolate Chip Ice Cream. First things first, you’ll want to grab those 3 cups of fresh bing cherries. Trust me, they’re the star of this show. Pit and halve them, then toss them into a small bowl with 2 tablespoons of lemon juice and 2 tablespoons of kirsch.
Now, sprinkle in 1/2 cup of sugar and give it all a gentle stir. This is where the magic begins—let those cherries macerate for at least 2 hours, or if you can plan ahead, overnight is even better. This step allows the cherries to soak up all that sweet, tart goodness. Just imagine the vibrant flavors blooming as they mingle together.
Once you’ve given the cherries some love, it’s time to make the ice cream base. In a medium mixing bowl, take 1 1/2 cups of sugar and, using a hand mixer on low speed, mix it with 1 1/2 cups of whole milk and 1 teaspoon of vanilla extract. Mix it until the sugar dissolves—this should take about 2 minutes.
Then, stir in 2 1/2 cups of heavy cream along with the reserved cherry juices. If you’re feeling adventurous, add 1/8 teaspoon of cherry extract for that extra pop of flavor. Now, pour this luscious mixture into your ice cream maker. As it starts to thicken, finely chop or grate 2/3 cup of dark chocolate (or more if you’re like me and can’t get enough chocolate).
Five minutes before the ice cream is ready, toss in the cherries. It’s almost like a cherry-chocolate surprise! Remember, the ice cream will be soft at this point, so if you prefer a firmer texture, just transfer it to an airtight container and let it chill in the freezer for a few hours.
And voilà, you’ve just made yourself a batch of Cherry Chocolate Chip Ice Cream! Just think about how satisfying it’ll be to scoop out that creamy, dreamy treat on a hot day.
Maybe you’ll even impress a few friends with your ice cream-making prowess. Or, you know, you could just keep it all to yourself—no judgment here. So, grab a spoon, find a comfy spot, and indulge in the fruits of your labor. Who knew making ice cream could be this much fun?
Cherry Chocolate Chip Ice Cream Substitutions & Variations
If you’re looking to mix things up with your Cherry Chocolate Chip Ice Cream, there are plenty of substitutions and variations to contemplate.
You can swap fresh cherries for frozen ones or even use raspberries for a different flavor. Instead of dark chocolate, try milk chocolate or white chocolate chips.
For a boozy twist, add a splash of bourbon instead of kirsch. If you’re dairy-free, use coconut milk or almond milk as a base.
Don’t forget to experiment with flavor extracts—almond or orange can add a unique touch. The possibilities are endless, so have fun customizing your ice cream!
What to Serve with Cherry Chocolate Chip Ice Cream
After whipping up a delicious batch of Cherry Chocolate Chip Ice Cream, you might wonder what to serve alongside it to enhance the experience.
I love pairing it with warm chocolate brownies; the contrast is heavenly. Fresh whipped cream adds a delightful touch, too.
Consider a drizzle of rich chocolate or a cherry sauce for extra indulgence. If you’re feeling adventurous, serve it between two sugar cookies for a fun ice cream sandwich.
A sprinkle of toasted almonds or crushed pistachios gives a nice crunch, balancing the creaminess.
Trust me, these pairings will elevate your ice cream experience to the next level!
Additional Tips & Notes
While making Cherry Chocolate Chip Ice Cream is a delightful experience, there are a few tips that can help you achieve the best results.
First, don’t skip the maceration step for the cherries; it enhances their flavor greatly. If you want a richer taste, consider using half-and-half instead of whole milk.
For a creamier texture, chill your ice cream maker bowl overnight. When mixing in the chocolate and cherries, do so gradually to guarantee even distribution.
Finally, if you prefer a firmer ice cream, let it freeze for a few hours after churning. Enjoy your homemade treat!