
Why You’ll Love This Cherry Vanilla Ice Cream Recipe
If you’re on the hunt for a delightful homemade treat, you’re going to love this Cherry Vanilla Ice Cream recipe.
The creamy texture and rich vanilla flavor blend perfectly with the sweet, juicy cherries, creating a revitalizing dessert you can’t resist.
It’s super easy to make, and you’ll find yourself enjoying every step of the process.
Plus, there’s something special about making ice cream from scratch; it feels rewarding.
You’ll impress friends and family with your skills, and trust me, they won’t be able to get enough.
Ingredients of Cherry Vanilla Ice Cream
When it comes to whipping up a delicious batch of Cherry Vanilla Ice Cream, having the right ingredients is key. You want to guarantee that every spoonful is rich, creamy, and bursting with flavor. Luckily, the ingredients list isn’t too long, and you might even have some of these items hanging around in your kitchen already.
So, let’s gather what you need, and get ready to create a sweet masterpiece that’s sure to satisfy your ice cream cravings.
Here’s what you’ll need to make this delightful Cherry Vanilla Ice Cream:
- 1 1/2 cups heavy whipping cream
- 1 1/4 cups whole milk, divided
- 1/2 cup sugar
- 1/4 cup light corn syrup
- 1/8 teaspoon kosher salt
- 2 vanilla beans
- 3 tablespoons nonfat dry milk powder
- 2 tablespoons cornstarch
- 1/4 teaspoon pure vanilla extract
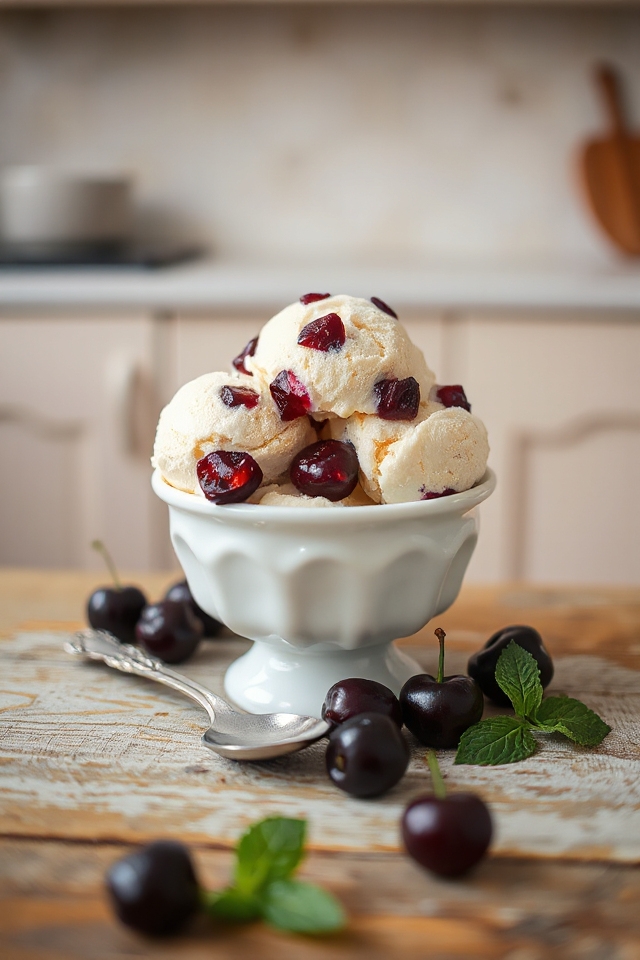
- 3/4 cup chopped fresh black cherries
Now, let’s chat about the ingredients a little more. First off, fresh black cherries are the star of the show, so don’t skimp on quality here – the sweeter and juicier they are, the better your ice cream will taste.
And speaking of fresh, using real vanilla beans really elevates the flavor profile; it’s like a warm hug for your taste buds. If you’re feeling adventurous, you could even mix in some other fruits or flavors, but let’s stick to the classic combo for now.
As for the heavy cream and whole milk, they’re both essential for that creamy texture we all love. And hey, if you don’t have light corn syrup, you could substitute with honey or maple syrup, but it might change the flavor a bit.
How to Make Cherry Vanilla Ice Cream
Making Cherry Vanilla Ice Cream is an enjoyable adventure, and I promise it’s easier than it sounds. First, you’ll need to gather your ingredients: 1 1/2 cups of heavy whipping cream, 1 1/4 cups of whole milk (which you’ll divide), 1/2 cup of sugar, 1/4 cup of light corn syrup, and a pinch of kosher salt. The real magic comes from 2 vanilla beans, 3 tablespoons of nonfat dry milk powder, 2 tablespoons of cornstarch, a splash of pure vanilla extract (1/4 teaspoon), and, of course, 3/4 cup of chopped fresh black cherries. You might want to make sure those cherries are ripe and juicy – trust me, they make all the difference.
Now, let’s plunge into the cooking! Start by combining the heavy whipping cream, 1/2 cup of whole milk, sugar, corn syrup, and salt in a saucepan. Take those fancy vanilla beans, split them down the middle, and scrape the seeds into the mixture. Toss the pods in too; they’re like little flavor powerhouses.
Heat this over medium heat, stirring frequently until it starts to steam. Just remember, we want steaming, not boiling, so keep an eye on it. While that’s happening, in a separate bowl, mix the remaining whole milk, nonfat dry milk powder, cornstarch, and vanilla extract until smooth.
Once your cream mixture is nice and steamy, add the cornstarch mix and bring it to a gentle boil over low heat while stirring constantly. You’ll want to whisk it until it’s smooth and thickens up, which should take about 2 minutes.
After that, remove the pods (we don’t want them in our ice cream) and, if it looks lumpy, give it a quick strain through a sieve. Then, transfer that glorious mixture into a storage container and cover it with plastic wrap, pressing it directly onto the surface to avoid any pesky skin forming on top.
Pop it in the fridge until it’s completely chilled – below 40° is the goal here. Once it’s cool, stir in those chopped cherries, and now you’re ready to freeze it in your ice cream maker according to the manufacturer’s instructions.
If you’re feeling impatient (who isn’t?), you can enjoy it soft right away, or for a firmer treat, store it in an airtight container in the freezer. Just remember to let it sit out for about 15 minutes before serving if it’s frozen solid – it’ll make scooping a whole lot easier. Enjoy your homemade cherry vanilla ice cream, and be prepared for everyone to ask for seconds!
Cherry Vanilla Ice Cream Substitutions & Variations
While I love the classic combination of cherry and vanilla, there are plenty of substitutions and variations you can explore to put your own spin on this delicious ice cream.
Try swapping fresh cherries for other fruits like strawberries or raspberries for a different flavor profile. You can also experiment with almond or chocolate extract instead of vanilla for a unique twist.
If you’re feeling adventurous, add in some crushed cookies or nuts for extra texture. For a dairy-free version, use coconut milk or almond milk in place of cream and milk.
The possibilities are endless, so have fun with it!
What to Serve with Cherry Vanilla Ice Cream
Cherry vanilla ice cream is a delightful treat on its own, but pairing it with the right accompaniments can elevate your dessert experience.
I love serving it with warm chocolate sauce for a delicious contrast or drizzling some honey over it for a touch of sweetness.
Fresh berries, like strawberries or raspberries, add a rejuvenating tartness that complements the flavors beautifully. A sprinkle of chopped nuts can provide a satisfying crunch, too.
For something extra special, I often pair it with a slice of rich chocolate cake—it’s a heavenly combination you simply have to try!
Enjoy your ice cream adventure!
Additional Tips & Notes
Pairing cherry vanilla ice cream with delightful accompaniments is just the beginning of enhancing your dessert experience.
I recommend serving it with a drizzle of chocolate or caramel sauce for an indulgent twist. You can also sprinkle crushed nuts for added texture.
If you want to elevate it further, consider adding a dollop of whipped cream or a scoop of tart yogurt on the side.
For storage, make sure to keep the ice cream in an airtight container to maintain its creaminess.
Finally, let it sit out for about 15 minutes before serving for the perfect scoopability. Enjoy!