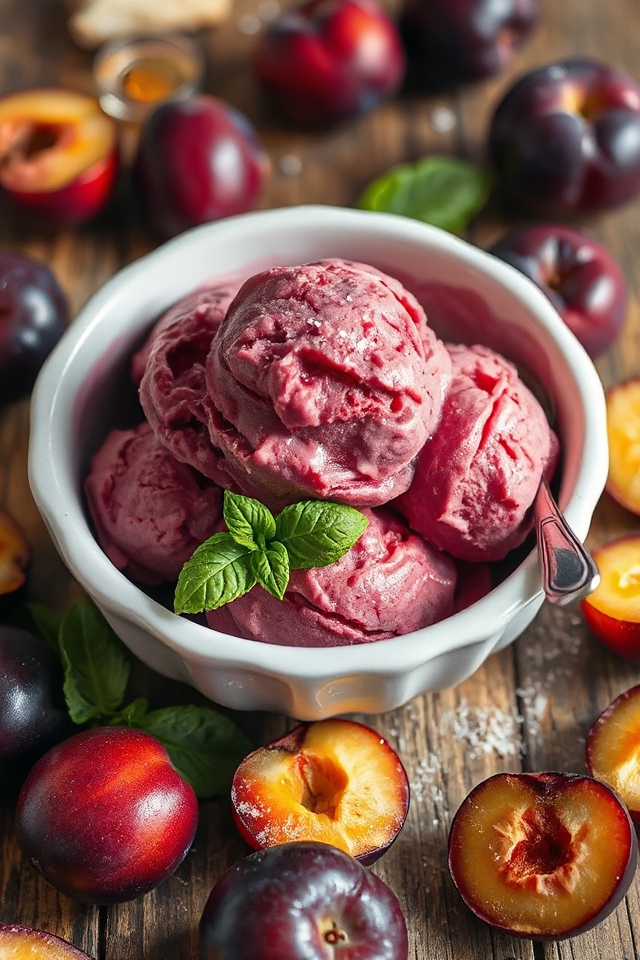
Why You’ll Love This Plum Ice Cream Recipe
You’re going to love this Plum Ice Cream recipe for its perfect balance of sweetness and tartness.
The creamy texture combined with the vibrant plum flavor creates an unforgettable treat. I appreciate how the tartness of the plums cuts through the richness, making each bite invigorating.
It’s not just a dessert; it’s a celebration of summer flavors. Plus, making it at home gives me a chance to experiment and adjust the sweetness to my liking.
Trust me, once you try this ice cream, you’ll find it hard to go back to store-bought varieties. Get ready to impress your friends!
Ingredients of Plum Ice Cream
Let’s talk about the delightful ingredients you’ll need to whip up this luscious Plum Ice Cream. This recipe isn’t just about throwing things together; it’s about creating a symphony of flavors that will dance on your taste buds.
And trust me, you’ll want to savor every creamy, fruity bite. So, roll up your sleeves, and let’s gather our ingredients. Here’s what you’ll need to make this summer treat:
- 1/2 cup water
- 2 tablespoons superfine sugar (or regular sugar blended until fine)
- 1/2 lb plums
- 1 cup whipping cream
- 1 cup milk
- 2 vanilla beans, split lengthwise
- 4 egg yolks (room temperature)
- 2/3 cup superfine sugar (or regular white sugar blended until fine)
Now, let’s pause for a moment to reflect on those ingredients. First off, have you ever tried using fresh, ripe plums? They add that zingy tartness, which is basically the star of this show.
You could use frozen plums in a pinch, but nothing beats the fresh stuff. And oh, the vanilla beans—splitting them and scraping out those tiny seeds may seem like a chore, but the flavor they impart is worth every second.
If you’re in a rush, feel free to use vanilla extract, but the real deal is what makes this ice cream sing. Just remember to take your egg yolks out ahead of time so they can warm up a bit; it helps them blend better when you’re mixing them into that hot milk.
How to Make Plum Ice Cream

Alright, let’s plunge into the sweet world of making Plum Ice Cream. First things first, we need to get that delicious plum flavor going. In a saucepan over low heat, combine 1/2 cup of water and 2 tablespoons of superfine sugar. Give it a little swirl every now and then until the sugar dissolves—no need for a full-on workout here, just a gentle stir will do.
Once the sugar has melted into the water, crank up the heat and let it come to a boil. Now, here’s the fun part: toss in your 1/2 lb of plums (don’t forget to pit them, of course) and let them simmer for about 3-5 minutes, or until they’re tender and begging to be pureed. Once they’re cool, we’re going to move on to the creamy part of our ice cream adventure.
While those plums are cooling, grab another saucepan and bring 1 cup of whipping cream, 1 cup of milk, and your split 2 vanilla beans to a gentle simmer. Let that sit for about 10 minutes to let those lovely vanilla flavors infuse.
Afterward, scrape the seeds out of the beans and toss them back into the cream mixture—goodbye pods, hello flavor. Bring that mixture back to a boil and, in a separate bowl, whisk together 4 room-temperature egg yolks and 2/3 cup of sugar until it’s pale and fluffy.
Now, here’s where we need to be a little careful: slowly pour in the hot milk mixture while whisking continuously. It’s like a dance, really—you don’t want scrambled eggs here. Once combined, return this mixture to the saucepan and cook it on medium-low heat until it thickens (about 6-8 minutes). Just remember, no boiling.
When it’s ready, strain it into a bowl to catch any lumps, and let it cool completely in the fridge for at least 4 hours. Yes, it’s a waiting game, but the results are so worth it.
Once your custard is nice and chilled, it’s time for some plum magic. Pit those cooled plums (they should be all soft and dreamy by now) and puree them in a blender or food processor until smooth, combining the delicious cooking liquid with them.
Now, fold that plum puree into your custard mixture. It’s like a color splash into a canvas of creamy goodness. After giving it a gentle mix, pour everything into your ice cream maker and process according to the manufacturer’s instructions.
Once it’s churned to creamy perfection, transfer it to a covered container and freeze it for several hours. And there you have it—your very own homemade Plum Ice Cream, just waiting to be devoured. Enjoy the fruits of your labor, one scoop at a time.
Plum Ice Cream Substitutions & Variations
While making plum ice cream is a delightful experience, experimenting with substitutions and variations can elevate it even further.
For a twist, try using ripe peaches or cherries instead of plums for a different fruit flavor. You can swap heavy cream with coconut milk for a dairy-free option.
If you crave a richer taste, add a splash of bourbon or almond extract. Consider incorporating spices like cinnamon or nutmeg for warmth.
Finally, mix in some crushed graham crackers or dark chocolate chunks for added texture. These small changes can lead to exciting new flavors that refresh your classic recipe!
What to Serve with Plum Ice Cream
When I enjoy a scoop of plum ice cream, I often think about what delicious pairings can enhance the experience. A drizzle of caramel sauce adds a sweet richness that complements the tartness of the plums.
I also love serving it alongside warm baked goods, like a slice of almond cake or a buttery tart. For a revitalizing twist, I sometimes pair it with fresh berries, which bring a burst of flavor.
If I’m feeling indulgent, I’ll top it with crushed pistachios for a delightful crunch. These combinations elevate my plum ice cream experience to a whole new level!
Additional Tips & Notes
To make the most of your plum ice cream experience, I recommend using ripe plums for the best flavor and sweetness.
If you can, try mixing different plum varieties for a unique taste.
Don’t skip the cooling time; letting the custard chill properly enhances the texture.
When blending the plums, make sure they’re smooth to avoid any chunks in your ice cream.
If you want a creamier result, consider adding an extra egg yolk to the custard.
Finally, store the ice cream in an airtight container to maintain its freshness and prevent ice crystals from forming.
Enjoy your homemade treat!